Available soon in the following languages:
Release Type: Module Enhancement/Core Process Change (Demand–Supply Allocation v1.0)
Applicable Roles: Regional Managers & Above (Sales)
Module: Demand Generation (Trip Management)
Objective: Create accurate, beat-wise sales demand without selecting warehouse / dispatch location
Feature Overview
What is Demand Generation?
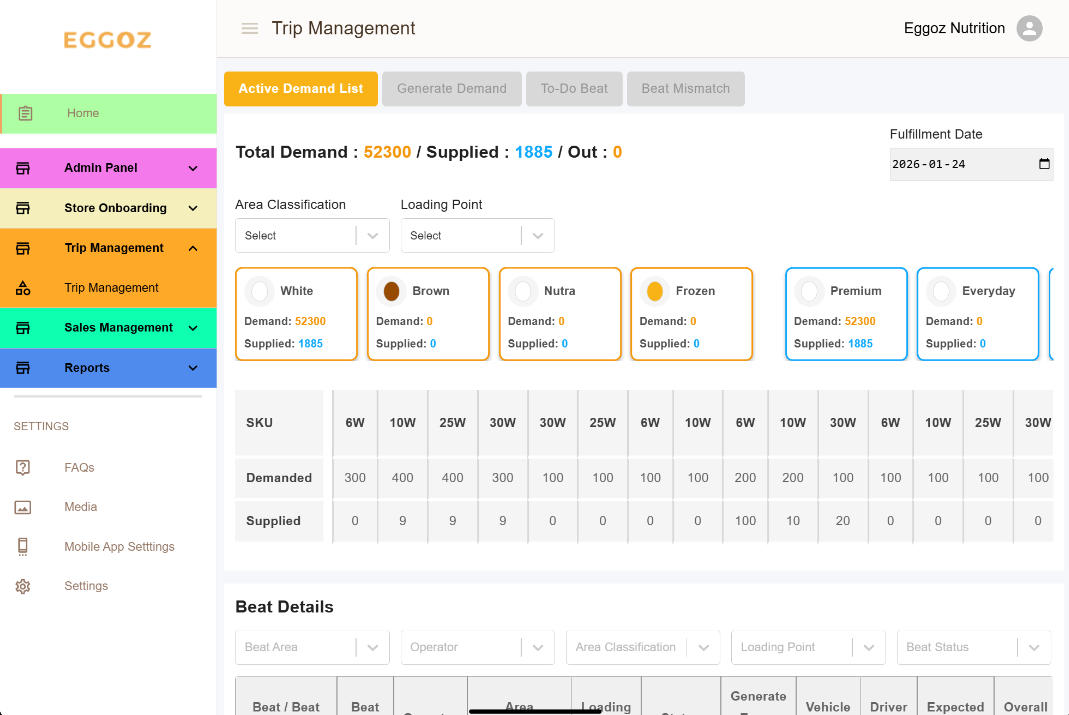
The Demand Generation (Trip Management) page is used by the Sales team to generate beat/retailer-wise sales demand by selecting:
- Pre-defined Beat No
- Retailers
- PO, SKUs and quantities
This page only captures demand intent.
It does not decide how or from where the demand will be fulfilled.
What changed in the new release?
Earlier
- Sales selected:
- Beat
- Retailers
- Loading / Dispatch Warehouse (Removed)
- Required manual coordination with Warehouse
- Caused frequent errors and rework
Now (v1.0)
- Sales selects only demand details
- Warehouse / loading point selection is removed
- Logistics decisions are shifted to Supply/Warehouse
Sales now focuses only on demand, not fulfillment.
Why This Change Was Required
Problems in earlier flow:
- Sales selecting dispatch warehouse (logistics task)
- Incorrect warehouse selection
- Manual follow-ups with Supply
- Carry forward required cancellation & re-creation
- Low flexibility for ad-hoc demand
With this change:
- Sales work becomes simpler
- Demand becomes flexible & editable
- Capacity-driven planning becomes possible
- Downstream re-adjustment is enabled
Who Can Use This Feature?
| Role | Access |
|---|---|
| Regional Managers & Above | Full Access |
| Warehouse / Supply | No Access |
Regional Managers cannot:
- Adjust demand against capacity
- Decide carry forward
- Select dispatch warehouse
Before You Start (Pre-requisites)
Ensure:
- You are logged in with Sales profile
- Beats & retailers are correctly mapped to you and Purchase Orders are already punched
- You understand:
- Which beat you are servicing
- Which retailers belong to that beat
- You know the fulfillment date logic (Plus-2)
Key Concepts
Date Logic
- Demand created today is fulfilled on Plus-2
- Example:
- Today: 1st Jan
- Demand fulfillment/Delivery: 3rd Jan
Always check the Fulfillment Date before confirming.
What This Page Does vs Does Not Do
| Does | Does NOT |
|---|---|
| Create demand | Adjust demand |
| Capture SKU quantities | Check capacity |
| Beat-wise planning | Assign warehouse |
| Retailer-level orders | Handle carry forward |
Step-by-Step: How to Create Demand Using Trip Management
Step 1: Login & Navigate
- Open https://
oms.eggoz.in - Login using Mobile No & OTP
- Navigate to Trip Management
Step 2: Select Beat
- Choose the Beat Num from dropdown you are creating demand for
- Beat determines:
- Demand Classification
- Retailer list
- Route coverage
Select the correct beat number — demand classification and retailers are beat-locked.
Step 3: Select Area / Channel Classification
- Select applicable:
- GT / ON-MT / OF-MT (as per system)
- This classification is later used for prioritization
Step 4: Select Retailer(s)
- Choose one or more retailers under the beat
- Retailer-wise demand will be recorded

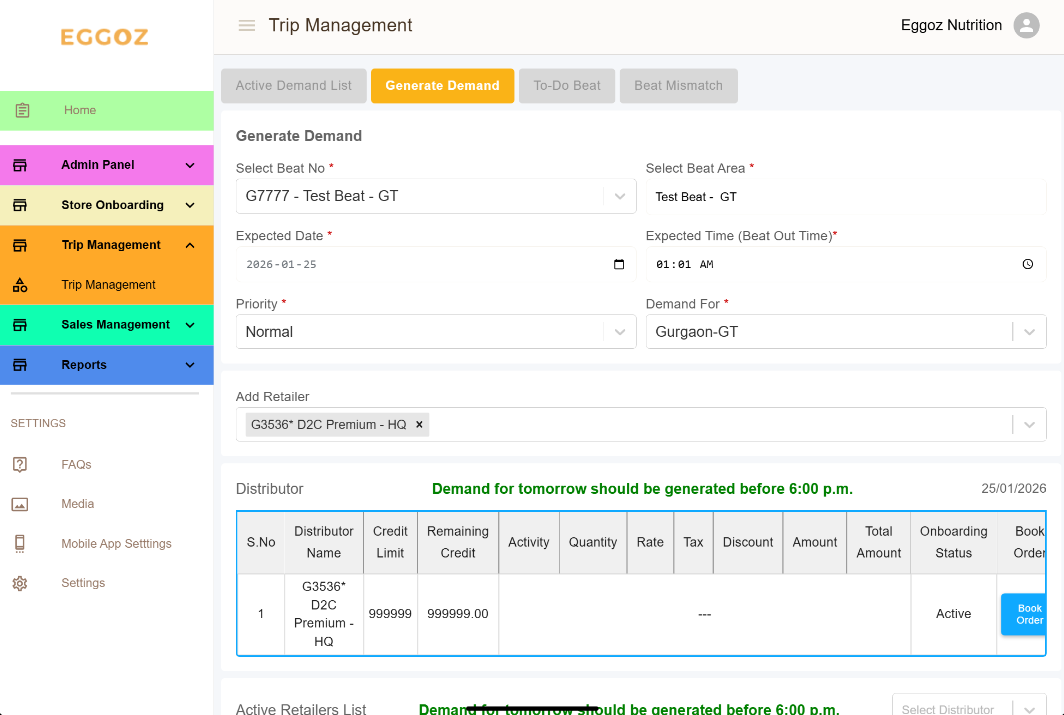
Step 5: Book Order (SKU Entry)
- Click Book Order
- Select PO (if applicable)
- Enter SKU-wise quantities:
- Select SKUs
- Add Qty
Enter tentative/PO quantities — adjustment happens later, not here.
Step 6: Verify Fulfillment Date
- Fulfillment date is auto-set to Plus-2
- You may:
- Keep default
- Select a future date (if allowed)
Step 7: Confirm Demand
- Review:
- Beat
- Retailers
- SKUs
- Quantities
- Fulfillment date
- Click Confirm
What Happens After Demand Is Created?
After confirmation:
- Demand is recorded in the OMS
- It moves to Trip Management (View Tab)
- System checks:
- Available Supply Capping
- Possible next steps:
- Auto move to Warehouse Allocation (if capacity is sufficient)
- Appear in Sales Demand Adjust (if capacity is insufficient)
Regional Managers do not need to do anything else.
Common Mistakes
- Selecting wrong beat number
- Ignoring fulfillment date
- Assuming warehouse selection is required
- Creating duplicate demand
Process Impact (Sales Perspective)
| Earlier | Now |
|---|---|
| Sales chose dispatch | Supply-owned |
| Manual coordination | System-driven |
| Rigid demand | Flexible & Re-adjustable |
| Carry forward manual | Automated flow |
Support & Escalation
Contact Tech-Support for:
- Missing beats / Beats Mapping
- Retailer visibility issues
- Date selection issues
- Demand not appearing in adjust page